Not All Fabrics Are Created Equal

Image

This bracelet from V and CO is super cute and I had to figure out how to make it.  I had a special event to work over the weekend, so I decided to make two bracelets in the organization’s colors.  With a little bit of practice, you’ll be able to make these bracelets in no time. If you get stuck, check out this video for more information.

The biggest takeaway for this bracelet is that you really need jersey fabric to make it work well. I bought two colors thinking they were similar fabric and they couldn’t be different if they tried.  When braiding the yellow bracelet, the fabric fell apart in my hand.  The red bracelet came together very similar to the bracelet in the V and CO example.  The two-fingered bracelet worked best for me. In doing the three or four it proved to be too big.  All in all it was a super cute bracelet. I’m excited to make more for additional outfits.

Red jersey fabric worked well as a bracelet. The yellow fabric felt similar to jersey fabric but was actually swim suit fabric and fell apart when braided.

Red jersey fabric worked well as a bracelet. The yellow fabric felt similar to jersey fabric but was actually swim suit fabric and fell apart when braided.

20121208_232934

Red bracelet with two finger braiding.

20121208_234001

Red jersey fabric with three finger braiding

Recipes Are Optional at Dessert Doodles

20121013-193230.jpg

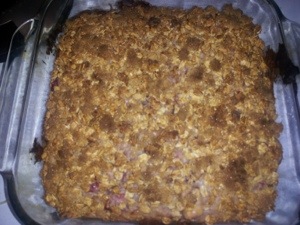
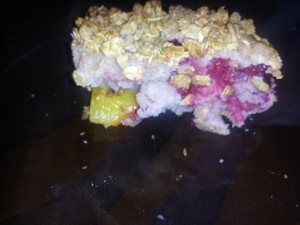
Over the past couple of weeks, I have been preparing to move. As I’ve been been condensing and consolidating things in my home, I’ve been trying not to grocery shop, so I don’t have to pack anything new. This means I have had to get creative in the kitchen. I randomly found a bag of cranberries in my freezer. That and a peach in my refrigerator became the source of my inspiration for this dessert. I’m not usually a cranberries fan around the holidays, (sorry mom) but I thought the sweetness in the peach would add a nice balance to this baking adventure. Since the berries were hard, I decided to cook them to make them softer and a little bit sweeter. I had less than a quarter cup of cinnamon sugar in a bag in my pantry, so I added that to the pot with the cranberries and I added some lemon juice and water (use about a half a cup of liquid in total). After about 5 minutes over medium heat, the color in the cranberries became brighter and they started to burst. While the cranberries cooled I mixed the following ingredients together:

  • 2 1/2 cups of flour
  • 3/4 cups of sugar
  • 1 teaspoon of salt
  • 3 eggs
  • 1/4 cup of oil
  • 1 teaspoon of baking soda

I used a lighter hand on the liquid because as the peaches and cranberries cook, they will add extra liquid to the the batter. I was impatient and mixed the cranberries into the batter without first draining them and second gently folding them into the batter.As a result, my batter turned red. I topped the dough mixture with a mix of granola and brown sugar to give it a little crunch.

I baked the bread in a 9X9 pan at 350 degrees for about 30 minutes. The bread is done when you can insert a knife or toothpick into the pan and it comes out clean.

This was good enough to make again, however the cranberries were still a little tart for my tastes. Next time, I’ll probably cook the cranberries on the stove for a few more minutes or add a little more sugar to the batter. The peaches and cranberries were a really nice contrast. This recipe would also be great in the morning as a muffin and has the potential to be a nice dessert you want to make a citrus buttercream frosting.

Happy baking from Dessert Doodles!

20121013-192413.jpg

Fun with Isomalt

I got to use a blow torch in my latest crafting adventure! For my friends and family who may be concerned, I am pleased to report that all of my fingers are present and accounted for. I had an opportunity to take an Isomalt class from the fabulous Sidney Galpern.

Isomalt is sugar substitute and when it is in liquid form, it can be used to mold and form beautiful sculptures.  I like Isomalt because it is forgiving. If I don’t like what I made, I can melt it down and try again.

Isomalt can burn you badly if you aren’t careful when you work with it. When melted, the Isomalt can reach more than 350 degrees in temperature. We tried a variety of techniques with different molds, cut out shapes in edible sugar sheets and did free-formed sugar.  My favorite shape was a 3D high heel shoe.

While the shoes were definitely a class favorite…

  • they took FOREVER to cool.  There is nothing you can really do about it other than just move the mold around on the silicone mat so it doesn’t stay on a hot spot for very long.
  • I didn’t get the exact amount of liquid in each mold cavity. While this wasn’t too big of a deal, when I put them together they had a hard time sitting up right.
  • The blow torch did help me fix a shoe, but not before melting the heel a little bit. (Good to know for next time!)

My other favorite mold was the bubble flower.  While it is not a mold I’d use for a fancier cake, I liked it because it worked well with sugar sheets. The flowers had a little extra personality.

Introductory class Isomalt creations

Isomalt is a specialized technique, but it is fairly easy to pick up. Consider taking a class before making an investment in the products.

Happy crafting from Dessert Doodles!

Lemon Cupcakes With Rasberry Cream Cheese Icing

My baking buddy came over recently and we can never just hang out without having some sort of baking adventure. Neither one of us had ever tried adding filling to a cupcake that was already baked. We were, also, in the mood to deviate from our normal chocolate (shocking I know!). We came up these babies: lemon cupcakes with a mixed-berry compote topped with a raspberry cream cheese icing garnished with blueberries.

Compote was new to both of us and fortunately it wasn’t as complicated as we thought it might be. Starting with a recipe for mixed berry compote (from yummly.com) as our guide, we added lemon juice, lemon zest, brown sugar, blueberries, strawberries and raspberries to our mixture.

After gently mashing the berries and cooking the mixture on low for about 20 minutes, we put it into a heat safe bowl and let it cool in the refrigerator for about an hour. The mixture was fairly runny (it may have gotten thicker if we’d cooked it a bit longer).

While the compote cooled, we started on the cupcakes and icing. The cupcakes were from a box mix and the icing was a combination of powdered sugar, cream cheese, butter, Crisco and raspberry sauce. While we waited for the compote to cool, we got to work coring the cupcakes. We used circle cookie cutters to make the same size hole in each cupcake and used measuring spoons to make a big enough well for the fruit.

Because the compote was still kind of runny, we were careful not add too much liquid to the cupcakes when we filled them. Otherwise, the cake would have been soggy.

After that was complete, we iced the cakes and added some blueberries on top for a little extra color.

Baking Tips and Hints

  • Don’t  forget to keep your cupcakes in the refrigerator if you add milk or cream cheese to your icing. Just use Crisco if you need to store your cupcakes at room temperature.
  • Feel free to experiment with the types of fruit you use for the compote. For beginners, I’d recommend using fruit with a similar texture (and size) so the compote cooks evenly.
  • Add some more powdered sugar to the left over juice from the compote and use it as a topping on your morning pancakes or waffles.

Happy baking from Dessert Doodles!

Cake Pop Wrecks Still Taste Delicious

I’ve been taking cake decorating classes for about six months and cake pops have always been my Achilles Heel.  I love looking at different cake pop designs.  Pintrest and Bakerella are two of my primary sources of inspirations. You can decorate cake pops in a million ways. Whether it is for a child’s birthday party or used as favors in a wedding, cake pops can fit into any celebration. Who wouldn’t like a tasty treat on a stick? Unfortunately, all of my cake pop attempts have been epic failures. I can’t keep them on the stick and when I try to dip them in chocolate, the pops never come out smooth.

I finally got the opportunity to learn a few tricks at a recent Wilton cake pops class.  While I learned a lot about what I was doing wrong, I’m still pretty far away from mastering the technique.  For the new bakers that have the patience to give cake pops a whirl, consider practicing on Rice Krispie treats before you move on to cake balls. Rice Krispie treats are dense and tend to hold up well in melted chocolate.

In theory, cake pops are not difficult to make. All you have to do is bake a cake according to instructions, crumble it and add some frosting so it sticks together. Roll the dough into balls and put them in the freezer to get cold, but not frozen.  Insert the lollipop sticks into the pops and dip them into the chocolate. Once they are dry, you can decorate them in a variety of ways.

After taking the cake pops class, my success rate dramatically improved. About 2/3rds of the cake pops actually stayed on the stick! Here is what I learned:

  • Dip the lollipop stick into a little bit of chocolate to help “glue” the stick into the ball. The diameter of the lollipop sticks seem to make a difference, so consider looking for cookie sticks for your dipped treats. (I’ll let you know how that works for me the next time I make cake pops.)
  • When you are tapping the excess chocolate off your pop don’t point the cake pop into the chocolate… You’ll likely tap the pop right off your stick. Instead hold the pop up in the air and use the handle of pop to tap off the excess chocolate.
  •  It is really easy to make the dough too moist.  You only need a very small amount of frosting to get the dough to stick together. Start adding the frosting a tablespoon or two at a time.
  • Sprinkles, melted chocolate, edible ink pens, jimmies and other candy can hide a lot of design flaws. Have fun decorating and experimenting. At the end of day, how could anything on a stick taste bad?

Have a good cake pops tip to share?  Let me know in the comments section your tricks.

Happy Baking!